Python怎么设置Excel单元格样式:字体、颜色与边框代码示例

详细讲解在Python中使用openpyxl库设置Excel单元格样式的核心方法,涵盖字体大小与加粗、背景填充色、单元格边框线条与样式的代码示例,并解析样式对象不可变机制与常见避坑指南。
openpyxl 库。通过其实例化并装配 Font(字体)、PatternFill(填充色)、Border(边框)与 Side(边框线)等样式类,可以直接赋予目标单元格对应属性,本文将通过具体步骤与完整代码示例演示这一过程。
一、样式配置的核心流程与环境准备
在 Python 中生成或处理 .xlsx 文件时,openpyxl 提供了完整的单元格样式抽象。需要注意的是,样式对象在 openpyxl 内部被设计为不可变(Immutable)或共享配置,不能直接修改已有属性(例如写 cell.font.bold = True 会报错),而是必须创建新的样式对象后重新赋值。
首先确保环境中已安装 openpyxl:
pip install openpyxl整个设置流程通常遵循统一的步骤:创建或加载工作簿、获取工作表、定位单元格、实例化具体样式对象、完成属性绑定,最后保存为文件。
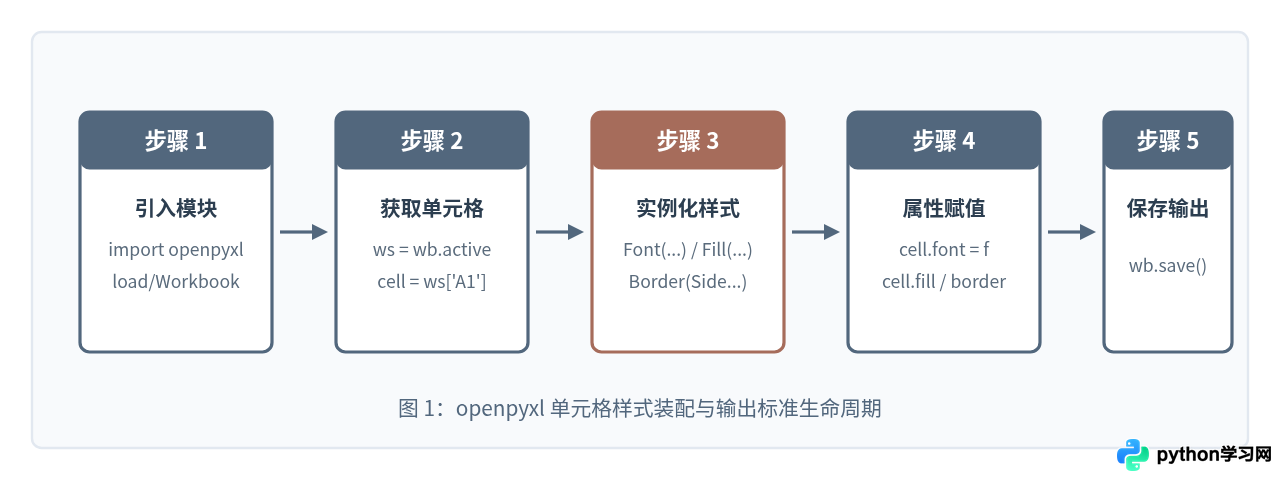
二、设置字体样式(Font)
文字呈现是表格排版最基础的部分。通过 openpyxl.styles.Font,可以配置字体名称、字号大小、是否加粗(bold)、倾斜(italic)、删除线(strike)以及文字颜色(color)。
在设置颜色时,openpyxl 接受标准 6 位十六进制 RGB 字符串(如 "FFFFFF"、"FF0000")或带 Alpha 通道的 8 位十六进制字符串(如 "0052677D")。注意不要加前导井号 #。
import openpyxl
from openpyxl.styles import Font

# 创建工作簿并定位单元格
wb = openpyxl.Workbook()
ws = wb.active
cell = ws['B2']
cell.value = "月度销售业绩统计"

# 定义字体样式:微软雅黑、14号字、加粗、颜色为蓝灰
title_font = Font(
    name="微软雅黑",
    size=14,
    bold=True,
    italic=False,
    color="52677D"
)

# 应用字体
cell.font = title_font

wb.save("font_sample.xlsx")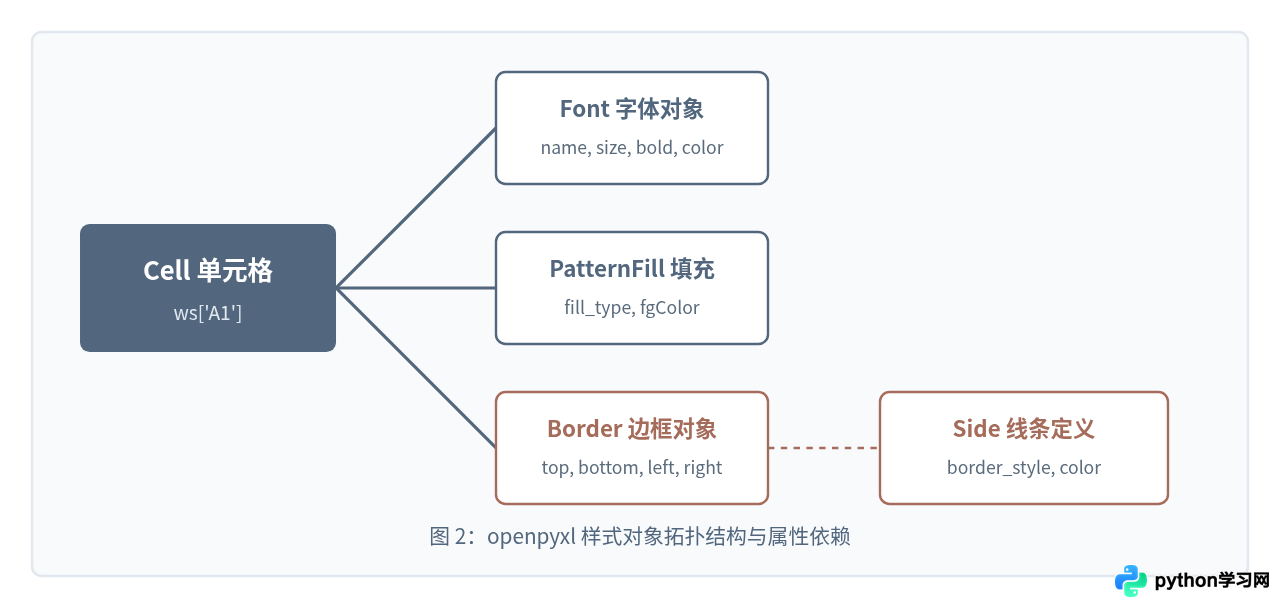
三、设置单元格背景填充颜色(PatternFill)
在 Excel 中为表头或特定状态行添加背景色,使用的是 PatternFill 类。最常见的场景是“纯色背景填充”,此时必须设置两个关键参数:
fill_type="solid":指定填充类型为纯色填充。若缺少此参数,填充色将不会生效。fgColor="RRGGBB":指定前景色(纯色填充下的实际可见背景颜色)。
from openpyxl.styles import PatternFill

# 设置主题深蓝灰背景填充
header_fill = PatternFill(
    start_color="52677D",
    end_color="52677D",
    fill_type="solid"
)

# 设置淡色警示/强调填充(赭红淡调)
warning_fill = PatternFill(
    start_color="FDEEE9",
    end_color="FDEEE9",
    fill_type="solid"
)

cell.fill = header_fill
四、设置单元格边框(Border 与 Side)
单元格边框设置与字体或填充不同,它由两层结构协同完成:
- Side 对象:定义具体单条线段的视觉特征,包括样式
border_style(如"thin"、"medium"、"thick"、"double"、"dashed")和颜色color。 - Border 对象:组合上下左右(以及对角线)各个方向的
Side实例,赋给cell.border。
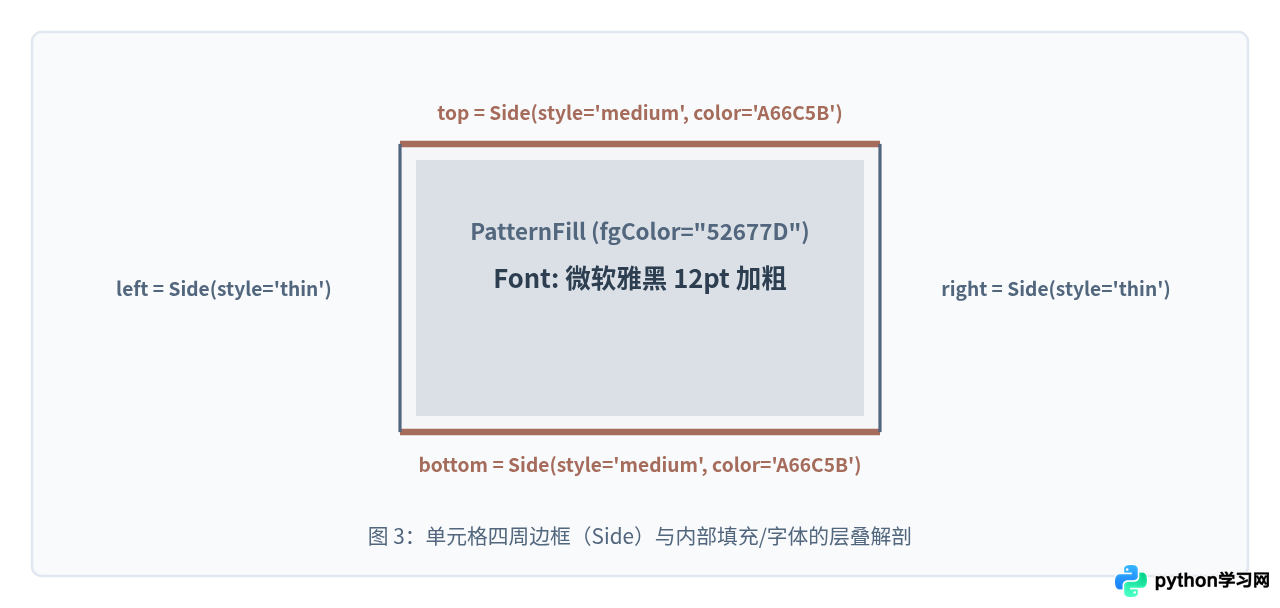
边框设置代码示例如下:
from openpyxl.styles import Border, Side

# 定义线条特征
thin_line = Side(border_style="thin", color="D1D8E0")
accent_line = Side(border_style="medium", color="A66C5B")

# 装配四周完整的细边框
standard_border = Border(
    left=thin_line,
    right=thin_line,
    top=thin_line,
    bottom=thin_line
)

# 装配带强调底边的表头边框
header_border = Border(
    left=thin_line,
    right=thin_line,
    top=thin_line,
    bottom=accent_line
)

cell.border = header_border
五、综合实战示例:生成完整格式化报表
下面是一个完整的可执行脚本,包含工作簿创建、数据填充、表头样式定制、数据行斑马纹背景以及加粗汇总边框的整套逻辑。
import openpyxl
from openpyxl.styles import Font, PatternFill, Border, Side, Alignment

def generate_styled_excel(output_filename="sales_report.xlsx"):
    wb = openpyxl.Workbook()
    ws = wb.active
    ws.title = "销售明细"

    # 1. 预先定义可复用的样式对象
    font_header = Font(name="微软雅黑", size=11, bold=True, color="FFFFFF")
    font_body = Font(name="微软雅黑", size=10, color="2C3E50")
    font_summary = Font(name="微软雅黑", size=10, bold=True, color="A66C5B")

    fill_header = PatternFill(fill_type="solid", fgColor="52677D")
    fill_zebra = PatternFill(fill_type="solid", fgColor="F8FAFC")

    side_thin = Side(border_style="thin", color="E2E8F0")
    side_double = Side(border_style="double", color="52677D")

    border_cell = Border(left=side_thin, right=side_thin, top=side_thin, bottom=side_thin)
    border_summary = Border(top=side_thin, bottom=side_double)

    align_center = Alignment(horizontal="center", vertical="center")
    align_right = Alignment(horizontal="right", vertical="center")

    # 2. 写入表头
    headers = ["产品名称", "销售数量", "单价 (元)", "销售总额 (元)"]
    ws.append(headers)

    # 为表头单元格设置样式
    for col_idx in range(1, len(headers) + 1):
        c = ws.cell(row=1, column=col_idx)
        c.font = font_header
        c.fill = fill_header
        c.alignment = align_center
        c.border = border_cell

    # 3. 写入数据行
    data = [
        ["服务器机架", 12, 4500.00],
        ["千兆交换机", 28, 1280.00],
        ["光纤跳线包", 150, 45.00],
        ["网络防火墙", 4, 18500.00]
    ]

    for row_idx, item in enumerate(data, start=2):
        total = item[1] * item[2]
        ws.append([item[0], item[1], item[2], total])

        # 斑马纹交替填充
        is_even = (row_idx % 2 == 0)
        current_fill = fill_zebra if is_even else None

        for col_idx in range(1, 5):
            c = ws.cell(row=row_idx, column=col_idx)
            c.font = font_body
            c.border = border_cell
            if current_fill:
                c.fill = current_fill
            # 文本左对齐,数值右对齐
            c.alignment = align_right if col_idx > 1 else Alignment(vertical="center")

    # 4. 汇总行设置
    summary_row = len(data) + 2
    ws.cell(row=summary_row, column=1, value="合计").font = font_summary
    sum_cell = ws.cell(row=summary_row, column=4, value="=SUM(D2:D5)")
    sum_cell.font = font_summary
    sum_cell.alignment = align_right

    for col_idx in range(1, 5):
        ws.cell(row=summary_row, column=col_idx).border = border_summary

    # 5. 调整列宽以适应内容
    col_widths = {1: 18, 2: 12, 3: 15, 4: 18}
    for col_idx, width in col_widths.items():
        ws.column_dimensions[openpyxl.utils.get_column_letter(col_idx)].width = width

    # 保存工作簿
    wb.save(output_filename)

if __name__ == "__main__":
    generate_styled_excel()
六、常见错误与排查速查
在实际编码中,很多开发者会遇到样式未生效或抛出异常的情况。常见的原因通常集中在不可变属性的原地修改、RGB颜色十六进制格式以及大批量单元格赋值的性能损耗上。
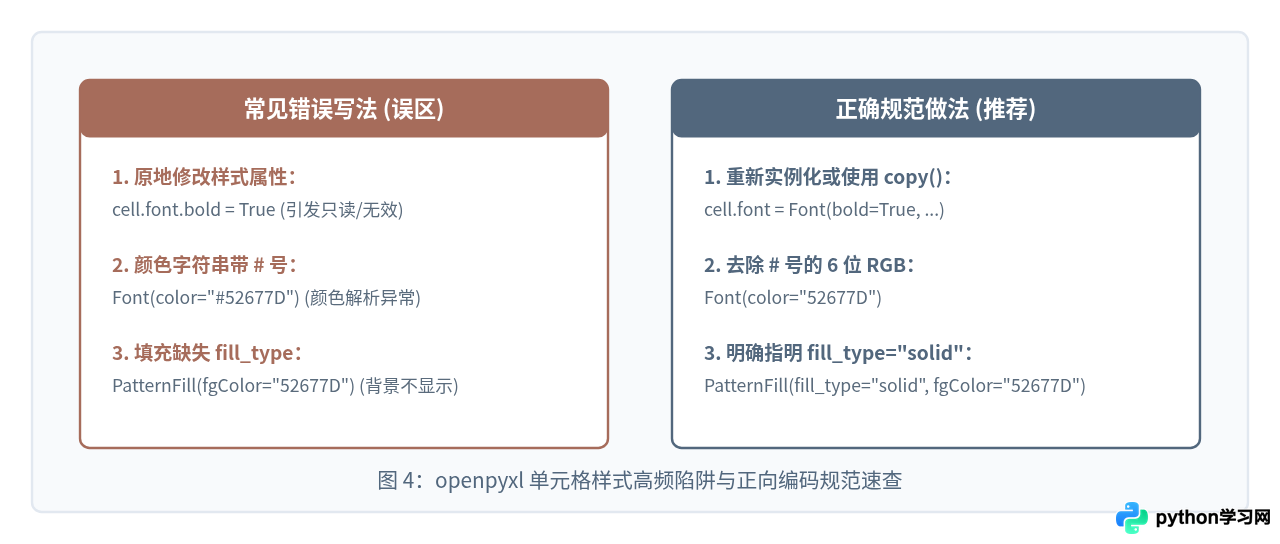
Font(...) 重复实例化。应在循环外预先创建好唯一的样式对象实例,在循环体内直接将其引用赋给对应单元格的 cell.font、cell.fill 与 cell.border。由于样式对象支持共享引用,这种写法既显著减少内存占用,又能大幅提升脚本的执行效率。
七、核心样式属性参数对照表
| 样式类名 | 核心参数名 | 常用取值示例 | 说明 |
|---|---|---|---|
Font |
name, size, bold, italic, color | name="微软雅黑", size=12, bold=True, color="52677D" |
颜色使用 6 位标准 RGB,无需带 #。 |
PatternFill |
fill_type, fgColor, bgColor | fill_type="solid", fgColor="F8FAFC" |
设置纯色背景时必须保留 fill_type="solid"。 |
Side |
border_style, color | border_style="thin", color="D1D8E0" |
线型可选 thin, medium, thick, double, dashed 等。 |
Border |
left, right, top, bottom | left=side_obj, bottom=side_obj |
每个方向均接收一个 Side 实例,未指定的方向不渲染边框。 |
Alignment |
horizontal, vertical, wrap_text | horizontal="center", vertical="center", wrap_text=True |
控制文本水平/垂直对齐及是否开启自动换行。 |
本站声明
本文内容仅供参考,不代表本站观点。转载或引用请注明出处。如发现内容问题,请通过联系我们页面反馈。