Java源码刨析之ArrayQueue

本文深入解析Java中基于循环数组实现的ArrayQueue数据结构。通过剖析构造函数、add、remove、get及resize等核心方法源码,结合图示说明head与tail指针的移动逻辑及内存布局变化,揭示其O(1)时间复杂度的原理及使用注意事项。
ArrayQueue基本使用示例
在探讨ArrayQueue的内部实现之前,先通过一个基础用例了解其行为。该队列支持添加元素、指定移除队头元素以及获取当前状态等功能:
public void testQueue() {
    ArrayQueue<Integer> queue = new ArrayQueue<>(10);
    queue.add(1);
    queue.add(2);
    queue.add(3);
    queue.add(4);
    System.out.println(queue); // 输出: [1, 2, 3, 4]

    queue.remove(0); // 仅支持传入0,移除队头第一个元素
    System.out.println(queue); // 输出: [2, 3, 4]

    queue.remove(0);
    System.out.println(queue); // 输出: [3, 4]
}
内部实现原理
ArrayQueue的核心优势在于使用循环数组结构,使得增加(add)和删除(remove)数据的时间复杂度均保持在 O(1)。相比之下,普通ArrayList的头部删除操作通常涉及元素位移,时间复杂度为O(n)。ArrayQueue内部维护两个整型索引:head指向队头,tail指向队尾待插入位置。
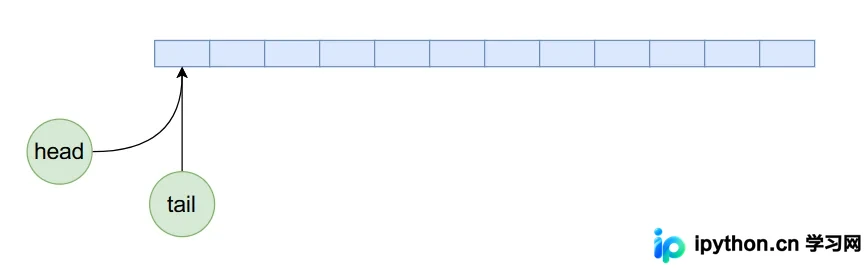
初始状态下,head和tail均为0,指向数组起始位置。随着数据的入队和出队,这两个指针会在数组空间内移动并发生回绕。下图展示了初始状态的内存布局:
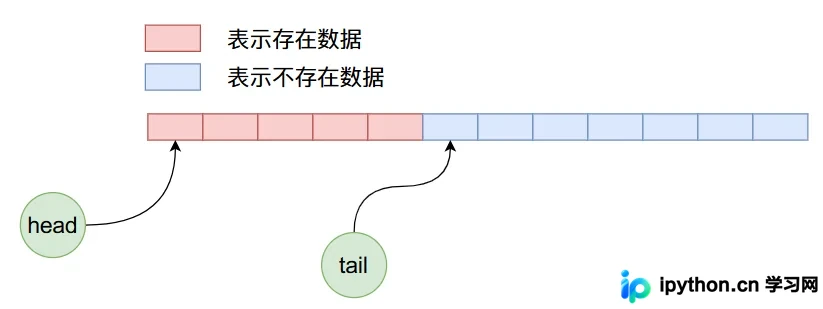
当向ArrayQueue中连续加入5个数据时,tail指针向后移动,数据依次填入数组。此时的内存布局如下所示:
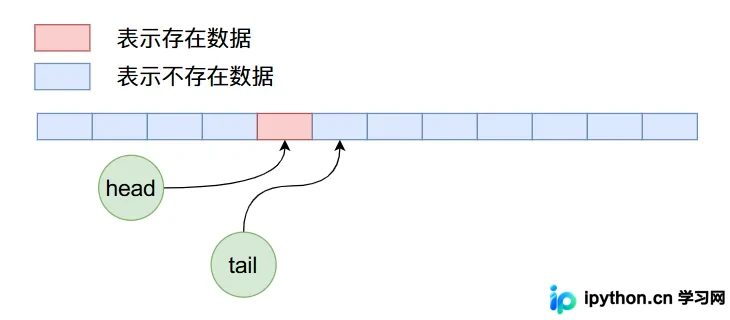
若执行4次删除操作,head指针向后移动,原队头元素被逻辑移除。经过这几次操作后,内部数据布局变为:
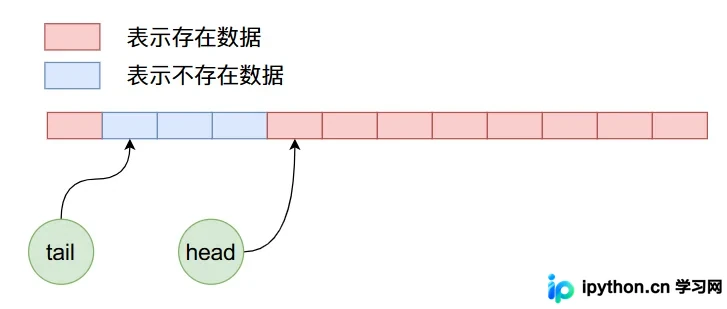
关键在于,当继续向上述状态中加入8个数据时,tail指针会触及数组末尾并“绕回”到数组开头未被使用的空间。这种机制实现了数组空间的循环利用,有效避免了内存浪费和频繁的元素搬运。此时的布局情况如下:
核心源码深度剖析
第1步:初始化容量与构建数组
目的:分配底层存储空间。为了避免空数组与满数组混淆(即head == tail时既可能是空也可能是满),ArrayQueue在用户指定的容量基础上额外多分配1个空间。
public ArrayQueue(int capacity) {
    this.capacity = capacity + 1;
    this.queue = newArray(capacity + 1);
    this.head = 0;
    this.tail = 0;
}
@SuppressWarnings("unchecked")
private T[] newArray(int size) {
    return (T[]) new Object[size];
}
第2步:入队操作(add)
入口:add(T o)
动作:将新元素写入tail位置,计算新的tail值。
参数与逻辑:
queue[tail] = o;:存入元素。int newtail = (tail + 1) % capacity;:利用取模运算实现指针的回绕循环。- 安全检查:若
newtail == head,说明数组已满,抛出IndexOutOfBoundsException。 - 更新:
tail = newtail;
public boolean add(T o) {
    queue[tail] = o;
    int newtail = (tail + 1) % capacity;
    if (newtail == head)
        throw new IndexOutOfBoundsException("Queue full");
    tail = newtail;
    return true;
}
第3步:出队操作(remove)
入口:remove(int i)
动作:取出队头元素,并将head指针向后移动。
重要参数:i必须为0,因为队列特性决定了只能从头部移除。若传入非0值,直接抛出IllegalArgumentException。
逻辑步骤:
- 检查是否为空:
head == tail则抛出异常。 - 保存并清空队头:读取
queue[head],并将其置为null以利于GC回收。 - 移动指针:
head = (head + 1) % capacity;。
public T remove(int i) {
    if (i != 0)
        throw new IllegalArgumentException("Can only remove head of queue");
    if (head == tail)
        throw new IndexOutOfBoundsException("Queue empty");
    T removed = queue[head];
    queue[head] = null; // Help GC
    head = (head + 1) % capacity;
    return removed;
}
第4步:获取元素(get)
入口:get(int i)
动作:获取距离队头偏移量为i的元素。
注意:这里的i并非数组绝对索引,而是相对head的偏移量。例如i=0表示当前队头元素。
public T get(int i) {
    int size = size();
    if (i < 0 || i >= size) {
        final String msg = "Index " + i + ", queue size " + size;
        throw new IndexOutOfBoundsException(msg);
    }
    int index = (head + i) % capacity;
    return queue[index];
}
第5步:扩容处理(resize)
场景:当需改变队列容量时使用。
风险提醒:扩容过程涉及数据搬迁,且需重新调整head和tail的索引基准,因此开销较大,不建议在高频操作中调用。
逻辑流程:
- 安全检查:新容量不能小于当前已有元素数量,否则会导致数据丢失。
- 边界检查:若新容量等于旧容量,直接返回。
- 创建新数组:申请大小为
newcapacity的新数组。 - 数据迁移:遍历原有元素,通过
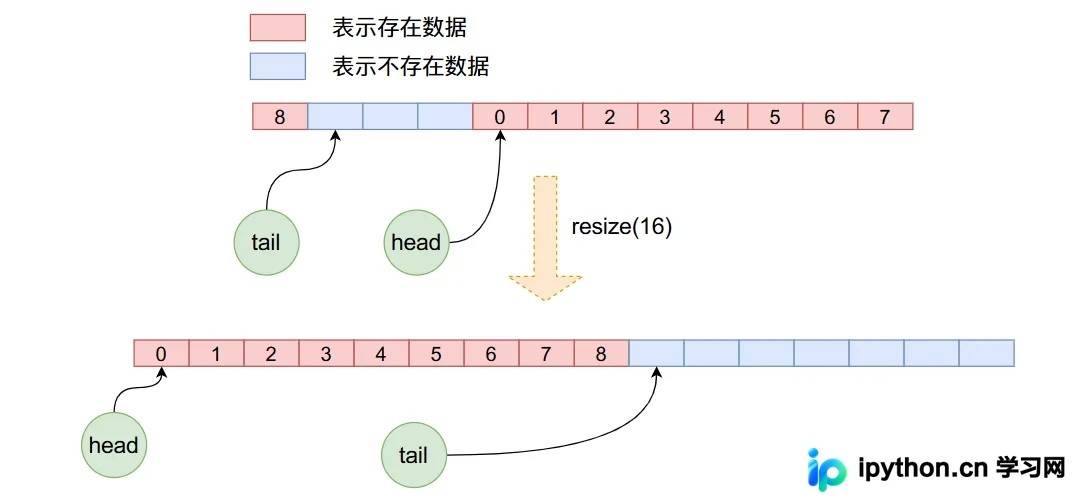
get(i)按顺序逐个放入新数组。这一步至关重要,因为它解决了旧数组中head不为0导致的逻辑断层问题,使数据在新数组中紧凑排列。 - 重置指针:
head`设为0,tail`设为当前元素总数。
public void resize(int newcapacity) {
    int size = size();
    if (newcapacity < size)
        throw new IndexOutOfBoundsException("Resizing would lose data");
    newcapacity++;
    if (newcapacity == this.capacity)
        return;
    T[] newqueue = newArray(newcapacity);
    for (int i = 0; i < size; i++)
        newqueue[i] = get(i);
    this.capacity = newcapacity;
    this.queue = newqueue;
    this.head = 0;
    this.tail = size;
}
在下图中,可以直观看到数据如何从一个分散的状态被重新整理到紧凑的新数组空间中:
总结
本文详细讲解了ArrayQueue基于循环数组的设计思想及其核心源码实现。重点分析了head与tail指针的循环递增机制,以及各核心方法的操作逻辑。理解ArrayQueue有助于深入掌握Java集合框架中环形缓冲区的处理技巧,虽然JDK标准库未直接提供名为ArrayQueue的公开类(常用ArrayDeque或LinkedList替代),但其底层的环形数组优化思想具有普遍参考意义。
以上就是Java ArrayQueue源码分析的详细内容,更多关于Java ArrayQueue资料请关注本站其它相关文章!
本站声明
本文内容仅供参考,不代表本站观点。转载或引用请注明出处。如发现内容问题,请通过联系我们页面反馈。