Python实现ResNet50深度残差网络详解与代码复现

本文详细解析ResNet50深度残差网络的核心原理,包括解决梯度消失问题的跳跃连接机制。深入剖析Conv Block与Identity Block的结构差异及作用,并提供基于Keras的完整Python代码实现,涵盖模型构建、权重加载及图像预测流程,帮助开发者快速复现并应用该经典模型。
残差网络概念解析
在研读YOLO3相关文献时接触到了残差网络概念,因其独特的结构设计引发了浓厚兴趣,进而追溯至该结构最初的应用场景——ResNet网络。
残差网络(Residual Net)的核心机制在于:
将网络靠前若干层中的某一层的输出数据,直接跳过中间的多层处理,引入到后续数据层的输入端。
这种设计使得后续特征层的内容能够直接继承前层某一层的信息,形成线性贡献关系。
其基本结构示意如下:
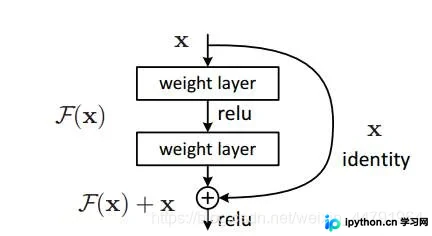
深度残差网络的设计初衷,是为了解决随着网络层数加深而导致的训练效率降低以及准确率难以进一步提升的问题。
ResNet50模型结构解析
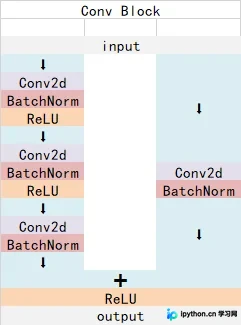
ResNet50主要包含两种基本模块:Conv Block(卷积块)和Identity Block(恒等块)。其中,Conv Block的输入与输出维度不一致,因此不能直接连续串联,其主要功能是调整网络特征的维度;
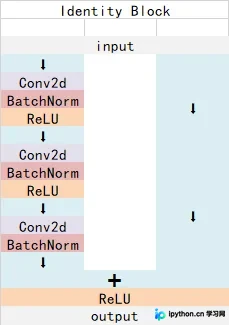
Identity Block的输入与输出维度保持一致,支持连续串联,主要用于增加网络深度。
Conv Block的具体结构如下:
Identity Block的具体结构如下:
上述两种模块均属于残差网络的标准结构组件。
ResNet50的整体网络架构如下:
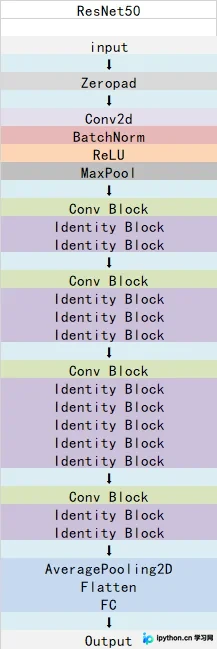
若觉得文字描述较为抽象,文末附有从网络获取的清晰结构图供参考,为避免篇幅过长,该图置于文章末尾。
ResNet50网络部分的Python代码实现
#-------------------------------------------------------------#
#   ResNet50的网络部分
#-------------------------------------------------------------#
from __future__ import print_function
import numpy as np
from keras import layers
from keras.layers import Input
from keras.layers import Dense,Conv2D,MaxPooling2D,ZeroPadding2D,AveragePooling2D
from keras.layers import Activation,BatchNormalization,Flatten
from keras.models import Model
from keras.preprocessing import image
import keras.backend as K
from keras.utils.data_utils import get_file
from keras.applications.imagenet_utils import decode_predictions
from keras.applications.imagenet_utils import preprocess_input
def identity_block(input_tensor, kernel_size, filters, stage, block):
    filters1, filters2, filters3 = filters
    conv_name_base = 'res' + str(stage) + block + '_branch'
    bn_name_base = 'bn' + str(stage) + block + '_branch'
    x = Conv2D(filters1, (1, 1), name=conv_name_base + '2a')(input_tensor)
    x = BatchNormalization(name=bn_name_base + '2a')(x)
    x = Activation('relu')(x)
    x = Conv2D(filters2, kernel_size,padding='same', name=conv_name_base + '2b')(x)
    x = BatchNormalization(name=bn_name_base + '2b')(x)
    x = Activation('relu')(x)
    x = Conv2D(filters3, (1, 1), name=conv_name_base + '2c')(x)
    x = BatchNormalization(name=bn_name_base + '2c')(x)
    x = layers.add([x, input_tensor])
    x = Activation('relu')(x)
    return x
def conv_block(input_tensor, kernel_size, filters, stage, block, strides=(2, 2)):
    filters1, filters2, filters3 = filters
    conv_name_base = 'res' + str(stage) + block + '_branch'
    bn_name_base = 'bn' + str(stage) + block + '_branch'
    x = Conv2D(filters1, (1, 1), strides=strides,
               name=conv_name_base + '2a')(input_tensor)
    x = BatchNormalization(name=bn_name_base + '2a')(x)
    x = Activation('relu')(x)
    x = Conv2D(filters2, kernel_size, padding='same',
               name=conv_name_base + '2b')(x)
    x = BatchNormalization(name=bn_name_base + '2b')(x)
    x = Activation('relu')(x)
    x = Conv2D(filters3, (1, 1), name=conv_name_base + '2c')(x)
    x = BatchNormalization(name=bn_name_base + '2c')(x)
    shortcut = Conv2D(filters3, (1, 1), strides=strides,
                      name=conv_name_base + '1')(input_tensor)
    shortcut = BatchNormalization(name=bn_name_base + '1')(shortcut)
    x = layers.add([x, shortcut])
    x = Activation('relu')(x)
    return x
def ResNet50(input_shape=[224,224,3],classes=1000):
    img_input = Input(shape=input_shape)
    x = ZeroPadding2D((3, 3))(img_input)
    x = Conv2D(64, (7, 7), strides=(2, 2), name='conv1')(x)
    x = BatchNormalization(name='bn_conv1')(x)
    x = Activation('relu')(x)
    x = MaxPooling2D((3, 3), strides=(2, 2))(x)
    x = conv_block(x, 3, [64, 64, 256], stage=2, block='a', strides=(1, 1))
    x = identity_block(x, 3, [64, 64, 256], stage=2, block='b')
    x = identity_block(x, 3, [64, 64, 256], stage=2, block='c')
    x = conv_block(x, 3, [128, 128, 512], stage=3, block='a')
    x = identity_block(x, 3, [128, 128, 512], stage=3, block='b')
    x = identity_block(x, 3, [128, 128, 512], stage=3, block='c')
    x = identity_block(x, 3, [128, 128, 512], stage=3, block='d')
    x = conv_block(x, 3, [256, 256, 1024], stage=4, block='a')
    x = identity_block(x, 3, [256, 256, 1024], stage=4, block='b')
    x = identity_block(x, 3, [256, 256, 1024], stage=4, block='c')
    x = identity_block(x, 3, [256, 256, 1024], stage=4, block='d')
    x = identity_block(x, 3, [256, 256, 1024], stage=4, block='e')
    x = identity_block(x, 3, [256, 256, 1024], stage=4, block='f')
    x = conv_block(x, 3, [512, 512, 2048], stage=5, block='a')
    x = identity_block(x, 3, [512, 512, 2048], stage=5, block='b')
    x = identity_block(x, 3, [512, 512, 2048], stage=5, block='c')
    x = AveragePooling2D((7, 7), name='avg_pool')(x)
    x = Flatten()(x)
    x = Dense(classes, activation='softmax', name='fc1000')(x)
    model = Model(img_input, x, name='resnet50')
    model.load_weights("resnet50_weights_tf_dim_ordering_tf_kernels.h5")
    return model
图像预测流程
完成网络构建后,可使用以下代码进行图像预测操作。
if __name__ == '__main__':
    model = ResNet50()
    model.summary()
    img_path = 'elephant.jpg'
    img = image.load_img(img_path, target_size=(224, 224))
    x = image.img_to_array(img)
    x = np.expand_dims(x, axis=0)
    x = preprocess_input(x)
    print('Input image shape:', x.shape)
    preds = model.predict(x)
    print('Predicted:', decode_predictions(preds))
预测所需的预训练ResNet50模型权重文件,可从https://github.com/fchollet/deep-learning-models/releases下载,获取过程十分便捷。
模型预测输出结果示例如下:
Predicted: [[('n01871265', 'tusker', 0.41107917), ('n02504458', 'African_elephant', 0.39015812), ('n02504013', 'Indian_elephant', 0.12260196), ('n03000247', 'chain_mail', 0.023176488), ('n02437312', 'Arabian_camel', 0.020982226)]]ResNet50模型的完整结构图展示
以上即为Python神经网络ResNet50模型复现的完整详解,更多关于ResNet50模型复现的技术资料,欢迎持续关注本站发布的其他相关文章。
本站声明
本文内容仅供参考,不代表本站观点。转载或引用请注明出处。如发现内容问题,请通过联系我们页面反馈。