使用TensorFlow实现VGG网络训练MNIST数据集

本文介绍如何使用TensorFlow实现VGG网络并训练MNIST数据集。VGG网络层数多,直接训练28x28图像易出问题,但通过合理设计卷积和池化层,可实现模型训练。文章提供完整的权重初始化、前向传播、损失计算及优化器配置代码,并分析训练过程中的准确率与资源消耗情况。
VGG网络在MNIST上的实现思路
VGGNet作为ILSVRC 2014年第二名的CNN模型,其最佳结构包含16个卷积/全连接层,从头到尾使用3x3卷积和2x2汇聚。然而,MNIST数据集的图片尺寸为28x28,直接应用VGG网络容易出现问题。因此,在实现时尽量保存VGG原模型结构,同时根据MNIST图片大小调整池化层的位置。
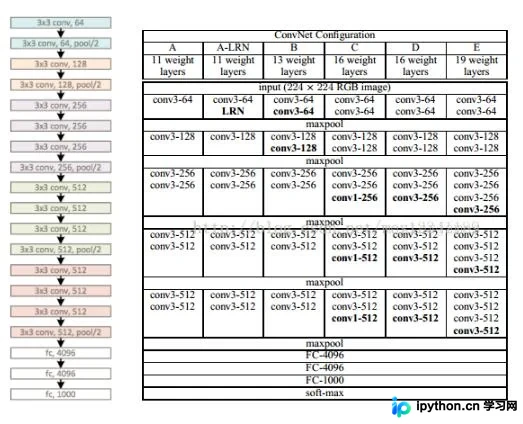
权重与偏置初始化
首先,需要定义VGG网络的权重和偏置。权重使用随机正态分布初始化,偏置初始化为零。具体代码如下:
weights ={
  'wc1':tf.Variable(tf.random_normal([3,3,1,64])),
  'wc2':tf.Variable(tf.random_normal([3,3,64,64])),
  'wc3':tf.Variable(tf.random_normal([3,3,64,128])),
  'wc4':tf.Variable(tf.random_normal([3,3,128,128])),

  'wc5':tf.Variable(tf.random_normal([3,3,128,256])),
  'wc6':tf.Variable(tf.random_normal([3,3,256,256])),
  'wc7':tf.Variable(tf.random_normal([3,3,256,256])),
  'wc8':tf.Variable(tf.random_normal([3,3,256,256])),

  'wc9':tf.Variable(tf.random_normal([3,3,256,512])),
  'wc10':tf.Variable(tf.random_normal([3,3,512,512])),
  'wc11':tf.Variable(tf.random_normal([3,3,512,512])),
  'wc12':tf.Variable(tf.random_normal([3,3,512,512])),
  'wc13':tf.Variable(tf.random_normal([3,3,512,512])),
  'wc14':tf.Variable(tf.random_normal([3,3,512,512])),
  'wc15':tf.Variable(tf.random_normal([3,3,512,512])),
  'wc16':tf.Variable(tf.random_normal([3,3,512,256])),

  'wd1':tf.Variable(tf.random_normal([4096,4096])),
  'wd2':tf.Variable(tf.random_normal([4096,4096])),
  'out':tf.Variable(tf.random_normal([4096,nn_classes])),
}

biases ={
  'bc1':tf.Variable(tf.zeros([64])),
  'bc2':tf.Variable(tf.zeros([64])),
  'bc3':tf.Variable(tf.zeros([128])),
  'bc4':tf.Variable(tf.zeros([128])),
  'bc5':tf.Variable(tf.zeros([256])),
  'bc6':tf.Variable(tf.zeros([256])),
  'bc7':tf.Variable(tf.zeros([256])),
  'bc8':tf.Variable(tf.zeros([256])),
  'bc9':tf.Variable(tf.zeros([512])),
  'bc10':tf.Variable(tf.zeros([512])),
  'bc11':tf.Variable(tf.zeros([512])),
  'bc12':tf.Variable(tf.zeros([512])),
  'bc13':tf.Variable(tf.zeros([512])),
  'bc14':tf.Variable(tf.zeros([512])),
  'bc15':tf.Variable(tf.zeros([512])),
  'bc16':tf.Variable(tf.zeros([256])),


  'bd1':tf.Variable(tf.zeros([4096])),
  'bd2':tf.Variable(tf.zeros([4096])),
  'out':tf.Variable(tf.zeros([nn_classes])),
}
前向传播与模型构建
接下来,定义前向传播函数。通过循环16次,每次根据模型定义添加卷积层和池化层。具体代码如下:
def convLevel(i,input,type):
  num = i
  out = conv2D('conv'+str(num),input,weights['wc'+str(num)],biases['bc'+str(num)])
  if type=='p':
    out = maxPool2D('pool'+str(num),out, k=2)
    out = norm('norm'+str(num),out, lsize=4)
  return out

def VGG(x,weights,biases,dropout):
  x = tf.reshape(x,shape=[-1,28,28,1])

  input = x

  for i in range(16):
    i += 1
    if(i==2) or (i==4) or (i==12) : # 根据模型定义还需要更多的POOL化,但mnist图片大小不允许。
      input = convLevel(i,input,'p')
    else:
      input = convLevel(i,input,'c')
损失计算与优化器配置
在得到预测结果后,计算损失并配置优化器。具体代码如下:
pred = VGG(x, weights, biases, keep_prob)
cost = tf.reduce_mean(tf.nn.softmax_cross_entropy_with_logits(logits=pred,labels=y))
optimizer = tf.train.AdamOptimizer(learning_rate=learning_rate).minimize(cost)
训练过程与结果分析
训练过程中,使用Adam优化器进行参数更新,并计算准确率。具体代码如下:
correct_pred = tf.equal(tf.argmax(pred,1), tf.argmax(y,1))
accuracy_ = tf.reduce_mean(tf.cast(correct_pred,tf.float32))

init = tf.global_variables_initializer()
with tf.Session() as sess:
  sess.run(init)
  step = 1
  while step*batch_size < train_iters:
    batch_x,batch_y = mnist.train.next_batch(batch_size)
    sess.run(optimizer,feed_dict={x:batch_x,y:batch_y,keep_prob:dropout})
    print(step*batch_size)
    if step % display_step == 0 :
      #loss,acc = sess.run([cost,accuracy],feed_dict={x:batch_x,y:batch_y,keep_prob=1.0})
      acc = sess.run(accuracy_, feed_dict={x: batch_x, y: batch_y, keep_prob: 1.})
      # 计算损失值

      loss = sess.run(cost, feed_dict={x: batch_x, y: batch_y, keep_prob: 1.})
      print("iter: "+str(step*batch_size)+"mini batch Loss="+"{:.6f}".format(loss)+",acc="+"{:6f}".format(acc))

    step += 1

  print("training end!")
训练10000次后,准确率在0.578125至0.648438之间。建议该深度模型循环训练10万次以上,以获得更好的效果。训练时CPU利用率可达100%,说明计算资源消耗较大。
总结
通过上述步骤,我们成功使用TensorFlow实现了VGG网络并训练了MNIST数据集。尽管VGG网络层数多,直接训练28x28图像容易出现问题,但通过合理设计卷积和池化层,可以实现模型训练。此外,训练过程中CPU利用率较高,说明计算资源消耗较大,建议在实际应用中优化模型结构或采用更高效的训练策略。
以上就是使用TensorFlow实现VGG网络训练MNIST数据集的详细内容,更多关于模型训练、深度学习的资料请关注本站其它相关文章!
本站声明
本文内容仅供参考,不代表本站观点。转载或引用请注明出处。如发现内容问题,请通过联系我们页面反馈。