Python新手必练的10个经典基础脚本示例

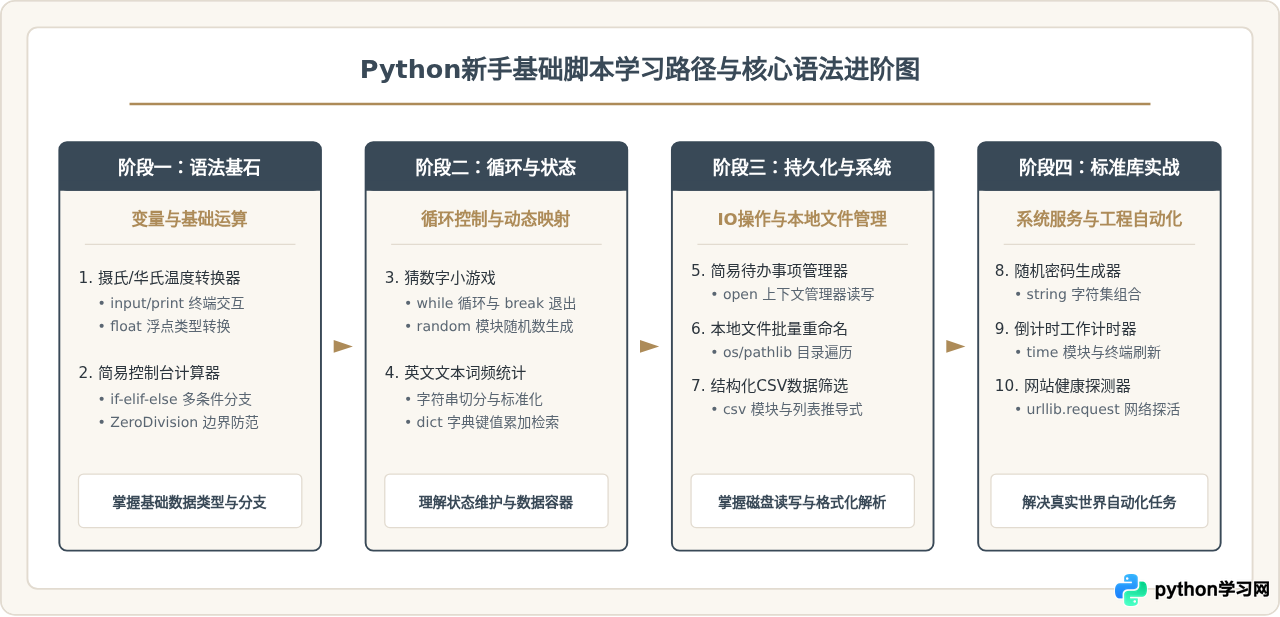
精选10个适合Python新手上手实操的经典基础脚本,涵盖基础算术、控制流程、核心数据结构、文件读写与标准库应用,配有完整代码、详细逐行解析与运行示范。
学习编程最有效的途径并不是反复阅读语法手册,而是通过目标明确的小型独立脚本练习。本文精选10个专为Python新手设计的经典基础脚本,覆盖变量运算、流程控制、集合容器、文件读写及标准库实战,帮助你循序渐进掌握Python编程核心能力。
1. 摄氏度与华氏度温度转换器
这个脚本是新手学习终端交互与算术表达式的最佳起点。它涵盖了从控制台读取字符串、进行类型转换、套用数学公式运算,以及格式化保留小数位输出的完整闭环。
# temp_converter.py
def convert_temperature():
    print("=== 温度双向转换工具 ===")
    print("1: 摄氏度 (Celsius) -> 华氏度 (Fahrenheit)")
    print("2: 华氏度 (Fahrenheit) -> 摄氏度 (Celsius)")

    choice = input("请选择转换模式 (1 或 2): ").strip()

    if choice == "1":
        c_str = input("请输入摄氏度数值: ")
        celsius = float(c_str)
        fahrenheit = (celsius * 9 / 5) + 32
        print(f"转换结果: {celsius:.2f}°C = {fahrenheit:.2f}°F")
    elif choice == "2":
        f_str = input("请输入华氏度数值: ")
        fahrenheit = float(f_str)
        celsius = (fahrenheit - 32) * 5 / 9
        print(f"转换结果: {fahrenheit:.2f}°F = {celsius:.2f}°C")
    else:
        print("错误:无效的选项,请输入 1 或 2。")

if __name__ == "__main__":
    convert_temperature()
代码要点与新手陷阱:
input()默认返回类型为字符串str,直接进行算术运算(如c_str * 9)会导致字符串重复而非数值相乘,因此必须使用float()显式转换。f"{celsius:.2f}"是 Python 3.6+ 推荐的 f-string 语法,.2f表示保留两位小数。
=== 温度双向转换工具 ===
1: 摄氏度 (Celsius) -> 华氏度 (Fahrenheit)
2: 华氏度 (Fahrenheit) -> 摄氏度 (Celsius)
请选择转换模式 (1 或 2): 1
请输入摄氏度数值: 26.5
转换结果: 26.50°C = 79.70°F
2. 简易命令行计算器
该脚本展示了分支语句 if-elif-else 的典型组织形式,并演示如何拦截零除异常(ZeroDivisionError),使程序具备基本的健壮性。
# simple_calculator.py
def calculate(num1, num2, op):
    if op == "+":
        return num1 + num2
    elif op == "-":
        return num1 - num2
    elif op == "*":
        return num1 * num2
    elif op == "/":
        if num2 == 0:
            return "错误:除数不能为 0"
        return num1 / num2
    else:
        return f"错误:不支持的运算符 '{op}'"

def main():
    print("=== 简易四则运算计算器 ===")
    try:
        a = float(input("请输入第一个数字: "))
        op = input("请输入运算符 (+, -, *, /): ").strip()
        b = float(input("请输入第二个数字: "))

        result = calculate(a, b, op)
        print(f"计算结果: {result}")
    except ValueError:
        print("错误:请输入合法的有效数字!")

if __name__ == "__main__":
    main()
关键收获:新手在此阶段应养成防范非法输入的习惯。try-except ValueError 能够有效捕获用户误输入字母的情况,避免程序直接抛出异常崩溃。
3. 猜数字小游戏
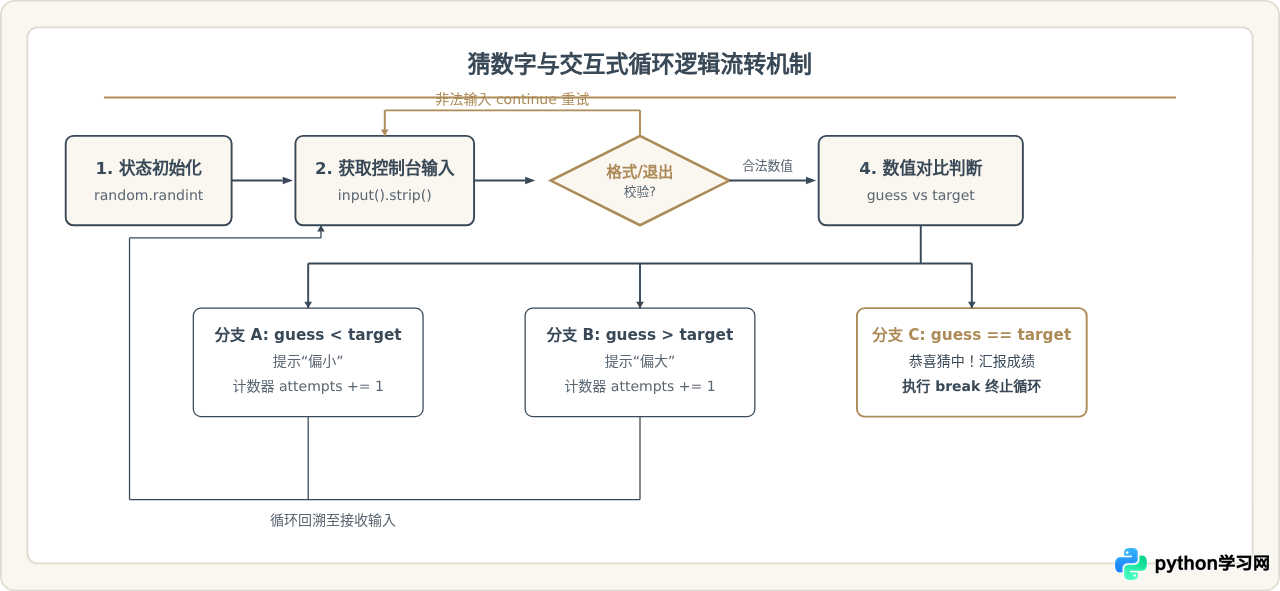
猜数字是理解 while 条件循环、状态变更及模块导入(random)的经典案题。每次根据玩家输入的数值给出大小提示,直到猜中退出。
# guess_number.py
import random

def play_guess_game():
    target = random.randint(1, 100)
    attempts = 0
    print("=== 猜数字小游戏 (1-100) ===")

    while True:
        user_input = input("请输入你猜的数字 (输入 q 退出): ").strip()
        if user_input.lower() == 'q':
            print(f"游戏退出,本次神秘数字是: {target}")
            break

        if not user_input.isdigit():
            print("提示:请输入正整数!")
            continue

        guess = int(user_input)
        attempts += 1

        if guess < target:
            print("太小了,再往大猜一点!")
        elif guess > target:
            print("太大了,再往小猜一点!")
        else:
            print(f"恭喜猜中!你一共尝试了 {attempts} 次。")
            break

if __name__ == "__main__":
    play_guess_game()
4. 文本词频统计器
字典(dict)是 Python 中最实用的内置数据结构。通过统计一段文本中每个单词出现的次数,可以完整掌握字符串的预处理、大小写归一化、去除标点符号以及字典的统计映射机制。
# word_frequency.py
import string

def count_words(text):
    # 1. 统一转小写,消除大小写歧义
    clean_text = text.lower()
    # 2. 移除所有常见标点符号
    for p in string.punctuation:
        clean_text = clean_text.replace(p, " ")

    # 3. 按空白符切分成单词列表
    words = clean_text.split()

    # 4. 使用字典统计词频
    frequency = {}
    for w in words:
        frequency[w] = frequency.get(w, 0) + 1

    return frequency

def main():
    sample_text = (
        "Python is powerful, and Python is easy to learn. "
        "Simple is better than complex, complex is better than complicated."
    )
    print("原始文本片段:")
    print(f'"{sample_text}"\n')

    freq_result = count_words(sample_text)
    # 按词频从高到低排序输出
    sorted_items = sorted(freq_result.items(), key=lambda x: x[1], reverse=True)

    print("=== 词频统计结果 (Top 5) ===")
    for word, count in sorted_items[:5]:
        print(f"单词 '{word}': 出现 {count} 次")

if __name__ == "__main__":
    main()
frequency.get(w, 0) + 1 避免了先使用 if w in frequency 做键存在性检查,当键不存在时返回默认值 0,使字典计数逻辑更为精简高效。
5. 简易待办事项管理器
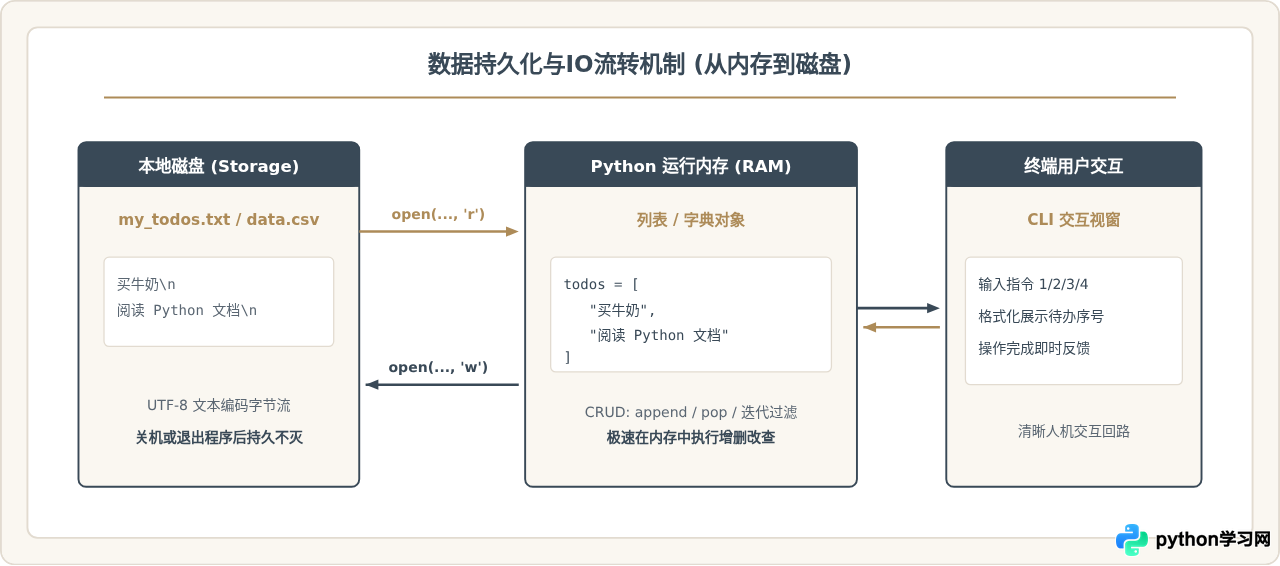
该脚本演示了基于文件的轻量级持久化方案。程序通过 open() 上下文管理器将任务清单持久保存在磁盘文本文件中,即使程序退出重启,历史待办依然完好。
# todo_manager.py
import os

TODO_FILE = "my_todos.txt"

def load_todos():
    if not os.path.exists(TODO_FILE):
        return []
    with open(TODO_FILE, "r", encoding="utf-8") as f:
        return [line.strip() for line in f if line.strip()]

def save_todos(todos):
    with open(TODO_FILE, "w", encoding="utf-8") as f:
        for item in todos:
            f.write(item + "\n")

def list_todos(todos):
    if not todos:
        print("当前没有任何待办事项。")
        return
    print("\n--- 待办事项清单 ---")
    for idx, item in enumerate(todos, start=1):
        print(f"{idx}. {item}")
    print("-------------------")

def main():
    todos = load_todos()
    while True:
        print("\n=== TODO 管理工具 ===")
        print("1: 查看清单 | 2: 添加待办 | 3: 完成并删除 | 4: 退出")
        choice = input("请选择操作编号: ").strip()

        if choice == "1":
            list_todos(todos)
        elif choice == "2":
            task = input("请输入要添加的待办任务: ").strip()
            if task:
                todos.append(task)
                save_todos(todos)
                print(f"已成功添加: '{task}'")
        elif choice == "3":
            list_todos(todos)
            if not todos:
                continue
            idx_input = input("请输入已完成的任务编号: ").strip()
            if idx_input.isdigit():
                idx = int(idx_input)
                if 1 <= idx <= len(todos):
                    removed = todos.pop(idx - 1)
                    save_todos(todos)
                    print(f"已移出完成项: '{removed}'")
                else:
                    print("错误:编号超出有效范围。")
            else:
                print("错误:请输入有效数字编号。")
        elif choice == "4":
            print("退出管理器,数据已自动保存!")
            break
        else:
            print("无效指令,请重新输入。")

if __name__ == "__main__":
    main()
6. 本地文件批量重命名工具
自动化批处理是 Python 的杀手级应用场景之一。本脚本利用 pathlib 模块扫描目标文件夹下的所有特定后缀文件,并按规则添加统一前缀或序号,彻底告别手工重命名。
# batch_rename.py
from pathlib import Path

def batch_rename_files(directory_path, target_ext=".txt", prefix="doc_"):
    dir_path = Path(directory_path)
    if not dir_path.exists() or not dir_path.is_dir():
        print(f"错误:指定路径 '{directory_path}' 不存在或不是文件夹。")
        return

    # 扫描指定后缀的文件
    target_files = sorted([f for f in dir_path.iterdir() if f.is_file() and f.suffix.lower() == target_ext.lower()])

    if not target_files:
        print(f"提示:在 '{directory_path}' 中未找到后缀为 '{target_ext}' 的文件。")
        return

    print(f"共发现 {len(target_files)} 个符合条件的文件,开始重命名...")
    for index, file_path in enumerate(target_files, start=1):
        # 构造新文件名,例如 doc_001.txt
        new_name = f"{prefix}{index:03d}{file_path.suffix}"
        new_path = file_path.with_name(new_name)

        file_path.rename(new_path)
        print(f"已重命名: {file_path.name} -> {new_name}")

    print("=== 全部重命名完成 ===")

if __name__ == "__main__":
    # 执行前请确保当前目录下有对应测试文件夹
    # 示例用法:对 ./test_folder 下的 txt 文件重命名
    import tempfile
    # 创建演示临时目录演示
    demo_dir = Path("./demo_files")
    demo_dir.mkdir(exist_ok=True)
    for name in ["notes.txt", "summary.txt", "report.txt"]:
        (demo_dir / name).write_text("demo content", encoding="utf-8")

    batch_rename_files("./demo_files", target_ext=".txt", prefix="archive_")
os.path,Python 3 推荐使用面向对象的 pathlib.Path,它兼顾了 Windows 与 Unix 系统的路径分隔符差异,表达更加优雅。
7. 随机密码生成器
该脚本展示了如何使用 string 模块获取标准字符集(大小写字母、数字、特殊符号),并通过 random.choice 动态构造具有高安全强度的密码。
# password_generator.py
import random
import string

def generate_strong_password(length=12, use_digits=True, use_symbols=True):
    if length < 6:
        raise ValueError("密码长度至少应为 6 位以上以保证基本安全性。")

    chars = string.ascii_letters
    required_chars = [random.choice(string.ascii_letters)]

    if use_digits:
        chars += string.digits
        required_chars.append(random.choice(string.digits))
    if use_symbols:
        chars += "!@#$%^&*()_+-="
        required_chars.append(random.choice("!@#$%^&*()_+-="))

    # 补充剩余字符
    remaining_length = length - len(required_chars)
    remaining_chars = [random.choice(chars) for _ in range(remaining_length)]

    # 整合并彻底打乱顺序
    all_chars = required_chars + remaining_chars
    random.shuffle(all_chars)

    return "".join(all_chars)

if __name__ == "__main__":
    print("=== 随机高强度密码生成工具 ===")
    pwd = generate_strong_password(length=14)
    print(f"生成的强密码: {pwd}")
8. 结构化 CSV 数据提取与筛选
在日常办公自动化与数据分析中,处理 CSV 是基础技能。该脚本利用标准库 csv 模块读取学生成绩表,并通过列表推导式筛选出符合条件的分数记录。
# filter_csv.py
import csv
import io

# 模拟生成的 CSV 数据源
csv_data = """姓名,科目,分数,状态
张伟,Python,88,及格
李娜,Python,95,优秀
王强,Python,56,不及格
刘芳,Python,91,优秀
陈杰,Python,73,及格
"""

def process_grades():
    # 使用 StringIO 模拟打开本地 csv 文件
    f = io.StringIO(csv_data.strip())
    reader = csv.DictReader(f)

    # 筛选分数大于或等于 80 分的优秀记录
    top_students = [
        {"name": row["姓名"], "score": int(row["分数"]), "status": row["状态"]}
        for row in reader
        if int(row["分数"]) >= 80
    ]

    print("=== Python 课程优秀学员名单 (>= 80分) ===")
    for s in top_students:
        print(f"学员: {s['name']:<4} | 分数: {s['score']} | 等级: {s['status']}")

    # 计算筛选出的平均分
    avg_score = sum(s["score"] for s in top_students) / len(top_students)
    print(f"\n优秀学员平均成绩: {avg_score:.1f} 分")

if __name__ == "__main__":
    process_grades()
技术亮点:csv.DictReader 会自动把表头映射为字典的键(Key),这样可以通过列名而非索引下标访问单元格,大大提升了代码的可读性与稳健性。
9. 控制台倒计时定时器
倒计时工具涉及时间计算与控制台刷新机制。通过 time.sleep(1) 与转义字符 \r,程序能够在同一行连续刷新输出,实现动态秒表效果。
# countdown_timer.py
import time
import sys

def countdown(seconds):
    print(f"=== 开启倒计时: 共 {seconds} 秒 ===")
    while seconds > 0:
        mins, secs = divmod(seconds, 60)
        time_format = f"{mins:02d}:{secs:02d}"
        # end='\r' 使光标回到行首,实现原地数值刷新
        print(f"剩余时间: {time_format}", end="\r", flush=True)
        time.sleep(1)
        seconds -= 1

    print("\n时间到!休息一下吧。")

if __name__ == "__main__":
    try:
        total_sec = int(input("请输入倒计时总秒数 (如 10): ").strip())
        countdown(total_sec)
    except ValueError:
        print("错误:请输入正整数!")
flush=True,字符可能会被缓存在系统缓冲区中,直到换行才集中打印,破坏倒计时视觉效果。
10. 网站健康探测与响应检查器
作为入门实践的压轴脚本,本示例利用标准库中的 urllib.request 向指定的 Web URL 发送 GET 探测请求,检测目标网站的 HTTP 状态码并测量响应耗时。整个过程完全无需安装第三方外部依赖。
# site_checker.py
import urllib.request
import urllib.error
import time

def check_website(url):
    print(f"正在探测目标服务: {url}")
    start_time = time.time()

    # 模拟通用浏览器头部,避免被基础反爬规则直接拦截
    headers = {"User-Agent": "Mozilla/5.0 (compatible; PythonProbe/1.0)"}
    req = urllib.request.Request(url, headers=headers)

    try:
        with urllib.request.urlopen(req, timeout=5) as response:
            latency = (time.time() - start_time) * 1000
            status = response.status
            print(f"探测成功: HTTP {status} OK | 延迟: {latency:.1f}ms")
            return True
    except urllib.error.HTTPError as e:
        latency = (time.time() - start_time) * 1000
        print(f"请求完成但返回错误码: HTTP {e.code} | 延迟: {latency:.1f}ms")
        return False
    except urllib.error.URLError as e:
        print(f"连接失败: 无法连接至服务器 ({e.reason})")
        return False
    except Exception as e:
        print(f"未知异常: {str(e)}")
        return False

if __name__ == "__main__":
    test_urls = [
        "https://www.python.org",
        "https://httpbin.org/status/200"
    ]
    for target in test_urls:
        check_website(target)
        print("-" * 35)
综合对比与知识点全景总结
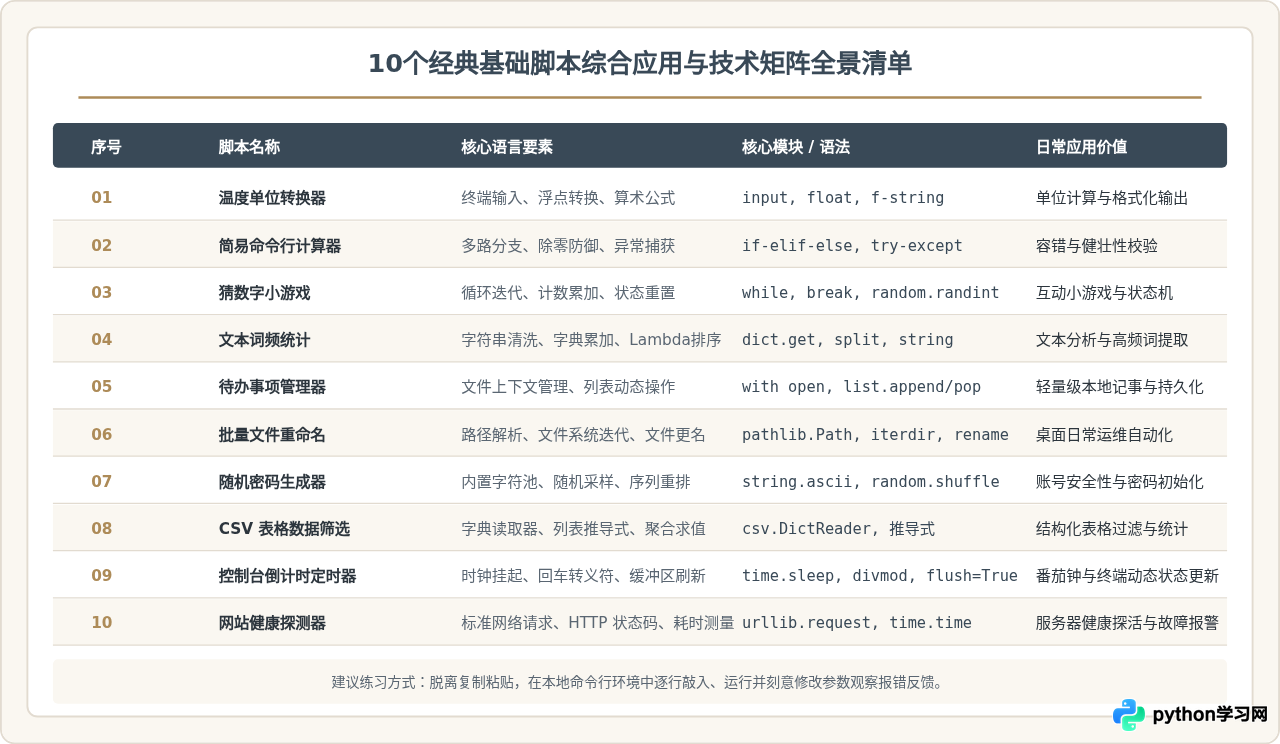
回顾上述10个脚本,每一题均针对性覆盖了 Python 最核心的一组语言机制。从初期的控制台交互到底层的异常防御、文件持久化及网络探活,循序渐进搭建起完整的编程思维。
新手进阶练习建议
完成这 10 个脚本的独立编写后,说明你已经牢固掌握了 Python 基础控制流程与标准库的使用规范。为了进一步巩固成果,可以尝试以下两种拓展路径:
- 功能叠加组合:将“网站健康探测器”的探测结果,通过“待办事项/文件写入”逻辑持久化保存为日常巡检日志,或者将“随机密码生成器”与“批量文件重命名”结合,生成唯一的加密伪随机文件标识符。
- 引入自动化调度:将脚本配置为本地操作系统的定时任务(例如 Linux / macOS 的
cron或 Windows 任务计划程序),让 Python 脚本真正融入日常工作流。
本站声明
本文内容仅供参考,不代表本站观点。转载或引用请注明出处。如发现内容问题,请通过联系我们页面反馈。